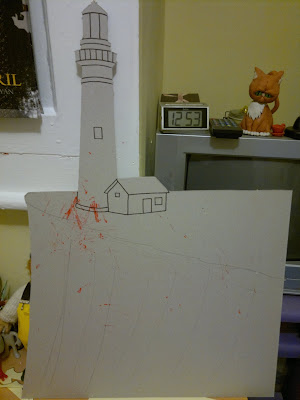
Both my Sea and my Lighthouse on a cliff will be made 2D ish so that they fit nicely in the background. It also makes the whole build process that much easier for me and as every shot would be filmed directly from the front it doesn't matter that they're all flat. I wanted the sea to be made up of lots of layers and the lighthouse to be slotted in somewhere towards the back as I thought it would give a nice effect like it did in my little test model!
The Lighthouse!
To make the Lighthouse I got a large A3 sheet of relatively thick card (I use this type of card a lot when it comes to building) and drew on my design of a rough cliff outline and a lighthouse + hut on top. I then carefully cut out the design using my Stanley Knife, which was pretty tricky to do around the top of the lighthouse to be honest, as the card is too thick for just one slice to cut through it.
Once that was done I painted the whole thing using white acrylic paint so that the colours that I painted on afterwards would stand out much nicer. It needed a few coats of white paint before the brown card wasn't visible, but once it was all cover and dry I could then paint onto it no problem.
The Sea!
Making the Sea will sound relatively simple but it was quite hard work to do! I started off by buying 10 big (must've been around A2 size) sheets of card. I got two different colour blues so that when they're layered up I could alternate the colours and it'd look a bit more striking, also you'd be able to see the wave shapes a lot better! I cut out wave shapes along the top and bottom of the longest sides of the card, which took quite a few hours as I'm a ridiculous perfectionist when it comes to stuff like this! Once that was done, and I had the set in front of me, I could work out how high each layer of wave needed to be. Each layer of wave is made of two pieces of card glued together so I had to make sure they were the same height before gluing them together.
To hold the waves up I had a number of ideas, a lot of which didn't work in the end, and the one that I ended up using was this one. I would get two small lollipop sticks and glue them onto a larger one, with enough space in between them for the card to slot through. I made it so that there would be two for each wave - though I maybe should have done more for some of the higher waves - and painted the ones holding the front waves blue so that they wouldn't be as noticeable. The idea works but it would have probably have been best to make the sticks, holding the sides of the waves up, a bit taller so that the waves didn't flop over so much, and it would've been good, like I said earlier, to make more of them for the higher waves at the back.
And here we have a sneaky look at how they look on the final set!
Thanks for taking a look! I hope to have the final look of the whole thing up as soon as I can!


No comments:
Post a Comment