Saturday 27 July 2013

Strike a Pose!

I realise it's been a little while since my last post on the "Fisherman" project but I've just realised that I never posted the pictures I took of my characters all posed and what not! So, here they are and I hope you enjoy!


So, hey, little life update: I actually managed to graduate from university last month (Go me! haha!). Seriously though, I hope you've enjoyed looking through this little blog of mine - even if you just stumbled onto it by accident! It's been a great outlet for me over my course and I'd like to think you've enjoyed my work/ posts as much as I have doing them. This may well be my last post for a while now so just a big thank you again for reading!

 If you would like any puppets/ sets/ or what-not built I won't say no haha! Just give me an email and I'll see what I can do!

Thursday 9 May 2013

The End Result!

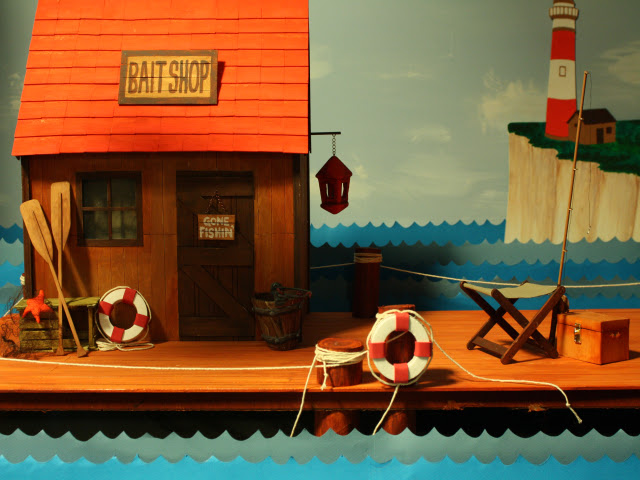
Here we have it. I've finally reached the end - well of this project anyway! I hope you like it!


And here is an adorable picture (in my opinion anyway!) of my two characters in the set!


Thanks for taking a look! And if you've been reading since the start of this project, I hope you like the end result and it was worth the wait! I'm about to start another quick project before the end of my uni year, so don't worry there'll be more to come soon haha!

Wednesday 8 May 2013

Building the Sea and Lighthouse!

Both my Sea and my Lighthouse on a cliff will be made 2D ish so that they fit nicely in the background. It also makes the whole build process that much easier for me and as every shot would be filmed directly from the front it doesn't matter that they're all flat. I wanted the sea to be made up of lots of layers and the lighthouse to be slotted in somewhere towards the back as I thought it would give a nice effect like it did in my little test model!


The Lighthouse!
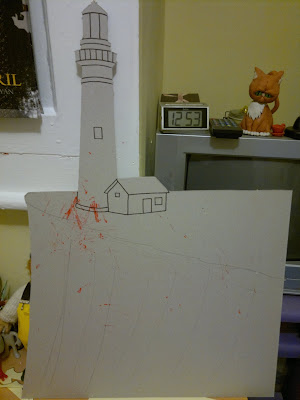
To make the Lighthouse I got a large A3 sheet of relatively thick card (I use this type of card a lot when it comes to building) and drew on my design of a rough cliff outline and a lighthouse + hut on top. I then carefully cut out the design using my Stanley Knife, which was pretty tricky to do around the top of the lighthouse to be honest, as the card is too thick for just one slice to cut through it.


Once that was done I painted the whole thing using white acrylic paint so that the colours that I painted on afterwards would stand out much nicer. It needed a few coats of white paint before the brown card wasn't visible, but once it was all cover and dry I could then paint onto it no problem. 


The Sea!
Making the Sea will sound relatively simple but it was quite hard work to do! I started off by buying 10 big (must've been around A2 size) sheets of card. I got two different colour blues so that when they're layered up I could alternate the colours and it'd look a bit more striking, also you'd be able to see the wave shapes a lot better! I cut out wave shapes along the top and bottom of the longest sides of the card, which took quite a few hours as I'm a ridiculous perfectionist when it comes to stuff like this! Once that was done, and I had the set in front of me, I could work out how high each layer of wave needed to be. Each layer of wave is made of two pieces of card glued together so I had to make sure they were the same height before gluing them together.


To hold the waves up I had a number of ideas, a lot of which didn't work in the end, and the one that I ended up using was this one. I would get two small lollipop sticks and glue them onto a larger one, with enough space in between them for the card to slot through. I made it so that there would be two for each wave - though I maybe should have done more for some of the higher waves - and painted the ones holding the front waves blue so that they wouldn't be as noticeable. The idea works but it would have probably have been best to make the sticks, holding the sides of the waves up, a bit taller so that the waves didn't flop over so much, and it would've been good, like I said earlier, to make more of them for the higher waves at the back. 


And here we have a sneaky look at how they look on the final set!


Thanks for taking a look! I hope to have the final look of the whole thing up as soon as I can!

Sunday 5 May 2013

Building the Boardwalk!

I'll try and make this a quick post as there isn't that much involved in building the Boardwalk - apart from lots of time and money on my part of course! First things first, I had to find a relatively thick slab of wood, that was both long enough and wide enough to hold all parts of the set that would be on it. Luckily for me I found the perfect size piece in uni, I then went about turning it into the boardwalk. I went to good ol' Pen and Paper in town and brought around five long planks of Balsa wood that I could then cut into strips (as shown in the picture). When I'd cut all the pieces to size and laid them out how I liked, I then went about gluing them down using Spray Mount. I tried using PVA to start off with but it was taking too long to dry and made the strips bend upwards, which was pretty annoying.


When all the strips of wood were glued down and dry I flipped the large slab of wood over and glued on three small planks of wood to the bottom. To reinforce the glue and make sure the planks stayed on I used some brackets to keep them in place. Really I should have done all this before I glued the Balsa wood on but ohh well! The planks on the bottom meant that when it was all flipped back over the boardwalk would stand higher off the ground.


I then painted the whole thing using brown acrylic paint. I used a sponge to get a better coating and before everything dried I went over it all with a dry sponge to try and take off some of the paint and make it look a little more worn. Once it was all dry I went at it with some sandpaper, to wear it out a little more, and then I added small details such as the nails at the end of the planks, using a black pen.


To make the parts that would run along the sides of the boardwalk, and make it look like they were holding it up, I used a load of kitchen and toilet roll tubes. To the tubes that would be on the top of the boardwalk, I glued on disks of card to one end of them. I then painted everything so that it would roughly look like wood and glued everything into place.


And here is the final Boardwalk! For the final image I've added 'rope' around the edges but I shall wait until I reveal the whole thing to show you that!


Thanks for taking a look! Sorry the picture quality isn't the best but I hope to show the final thing soon, and those pictures are pretty ace!

Friday 3 May 2013

Building the Hut

For something that's going in the background of the set, a lot of work has gone in to this hut! I made the door slightly smaller than the actual fisherman puppet, as I thought it would be far enough in the background for you not to notice but I was wrong and it has to be the only thing I don't like about the hut - I've never liked something I've built so much! 

Anyway, to build it I used some big, relatively thick sheets of card to build the structure and then cut out strips of balsa wood to make a door and window, which I then glued on. When that was done, I used hundreds of lollipop sticks to cover the walls to look like panels of wood. Once the walls were all done I could then work out the size that the roof needed to be.


I was going to cover the roof in lollipop sticks as well but then I had the idea of using tiles of balsa wood instead. I only covered the front of the roof fully as that would be the only part on show. I really like the effect it gives and I'm pretty glad I chose to do this rather than the lollipop sticks!


I then painted the whole thing, making sure I used a variety of brown tones on the walls so it didn't look too bland. When that was all done I fixed all the walls together using brackets and glue!


I painted the roof red, as I thought it gave a better aesthetic look, and added extra detailing down the sides of the hut and on the roof.


I added some extra details to the hut such as the curtains and the lamp and the hut was done! And here it is, the final look of the hut!


Thanks for taking a look! More to come soon!
Tuesday 30 April 2013

Props and Set pt three

I'm just going to talk through one prop today, and though there isn't much that has gone into its build, skills-wise, I just want to show you all the little details involved in it.

The Cereal Box
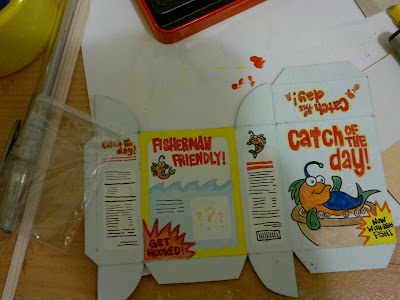
To make my 'Catch of the Day!' cereal box I first decided to make the structure out of some card that I had lying around, but I found it was too floppy and not strong enough to keep its shape once I'd painted onto it with my watercolours. I then thought of doubling up the card to make it stronger but it just gave the same kind of outcome. Then I thought to myself 'Hmm I wonder what material I could use that would make a great cereal box structure?' and after moments of pondering I came to the conclusion that an actual cereal box would make the best option. I know what you're thinking: 'Charlotte, stroke of genius right there, never would've thought of that!'. Thanks! I do try haha!


So I got my cereal box - making sure I'd taken out the actual cereal out first of course! - and cut out the net shape of a cereal box so that I could fold it all together when I was done decorating it. This is my first attempt as when I test folded it together it didn't sit too well so I decided to make another. I used the net shape, that I wasn't going to use for my cereal box, to rough out my design onto to see if it all fit nicely and didn't look too squished together on the box.


I painted the new/ better net shape white, using acrylic paint, so that it would give a better surface to work with and would make all the other colours stand out much nicer. I painted a few layers of white as the brown cardboard seeped through a little after the first layer. When that was all done I then lightly drew out my design onto the box, and when I was happy with how it looked I went about painting it using watercolours this time. Once the whole box was painted and dry I drew on details and outlines using a fine black pen.


When that was all done I glued it all together, apart from the flap at the top as I wanted that to open and close.


Just for an added bit of detail I cut out tiny little fish shapes, out of white card, and crushed up a Ginger Nut Biscuit, then mixed them up together in a little plastic pouch (with a resealable top) that was the perfect size for the cereal box. This would then be the cereal in the box! And because I'd left the top flap of the box unglued I could easily put the cereal inside the box and close it up no problem!


Thanks for taking a look! I hope you liked my little cereal box and cereal! More on props and set to come soon.

Sunday 28 April 2013

Props and Set pt two

So hey! Welcome to the second part of the prop/ set build of my project! I'm not going to go through too much and I'm not going to show the actual final images of some of the props as if I do you'll see too much of the final thing - and it's not time for that just yet!

The Lamp!
Okay, so it's a little bit cheeky but I was running out of time so I brought this polystyrene piece that was shaped like a lamp. It was the perfect size and shape for my set and working with it would save me so much time! If you can find something that would work better for you than if you were to make it yourself, I say by all means go for the easy option, you'll save yourself a lot of stress and time by doing so!


So I took the polystyrene lamp and cut out the centre-ish part using my trusty Stanley Knife - this is actually a second lamp as I got a little too knife happy with the first one! I then painted it red using acrylic paint. I found that painting straight on to the polystyrene surface just left the paint flaking off and patchy, so to stop that I sprayed the whole thing with Spray Mount first, which seemed to do the trick! 
This isn't the final image, for that I've painted more detail on it and added a tiny bulb inside. I've also added a chain to the top so that it can hang from the side of the hut. I'll show you that when I've shown you everything else first!


Life Preserve Rings!
Okay, again a little bit cheeky but I brought these polystyrene rings to use for my Life Rings! (I brought all the polystyrene products from a shop in Cardiff called Inkspot if you were wondering). I'd been searching for ages for something to use for these rings, my first thoughts were to use some plastic rings off one of those children's ring stacking toys but I couldn't find any! Anywhere! So when I found these rings I was happy to say the least. I then cut out strips of red Funky Foam and wrapped then around the two rings and glued them in place.


I made some hook type things from these little gold jewellery parts and pushed then in to the tops of the red parts of the rings to hold the 'ropes' in place. The 'rope' is just some string that I got to add a bit more detail to the rings.


The Fishing Rod!
I think the fishing rod is probably one of my favourite props. I made it by using a balsa wood rod, cut to the right size, a bobby thread, and some Funky Foam. To create the basic shape I wrapped and glued a strip of Funky Foam to the bottom of the pole and glued in a small piece of the balsa wood rod in to it for the thread to slip on to. The toilet roll tube in the photo is slightly misleading as I used the Funky foam to wrap around the bottom of the pole instead of that in the end, though I did try it will the roll first but it just didn't work.


When that was all done I painted the whole thing in different shades of brown acrylic paint and drew on some details. I glued on a small card disk to the end of the small pole holding the thread, once it was slotted in place, to stop it slipping off. It also means the tread can spin freely so it sort of is an actual working fishing rod (ish!). 
This isn't the final look of the fishing rod, I've also added a golden coloured handle to the thread/ wheel part and then similar golden hooks to the ones on the life rings, up the fishing rod itself for the string to thread through. I also tied on a little fishing hook to the end of the string, which was just a piece of metal that I bent in to shape.


Sorry for the lack of final pictures, I only seem to have them whilst they're apart of the final set, and I don't want to be revealing that just yet! Thanks for taking a look though! More to come soon!