Saturday, 27 April 2013

Props and Set pt one

Alright! So we've done the puppets and I think it's time to move on to the props and set. I've actually got all the props and set done - finished everything today in fact! There is a lot to talk about and quite a few props and sections of the set to talk through, so I'll only go through a few of them today and maybe do a few more posts over the week before revealing the whole thing.

The Lobster Catcher!
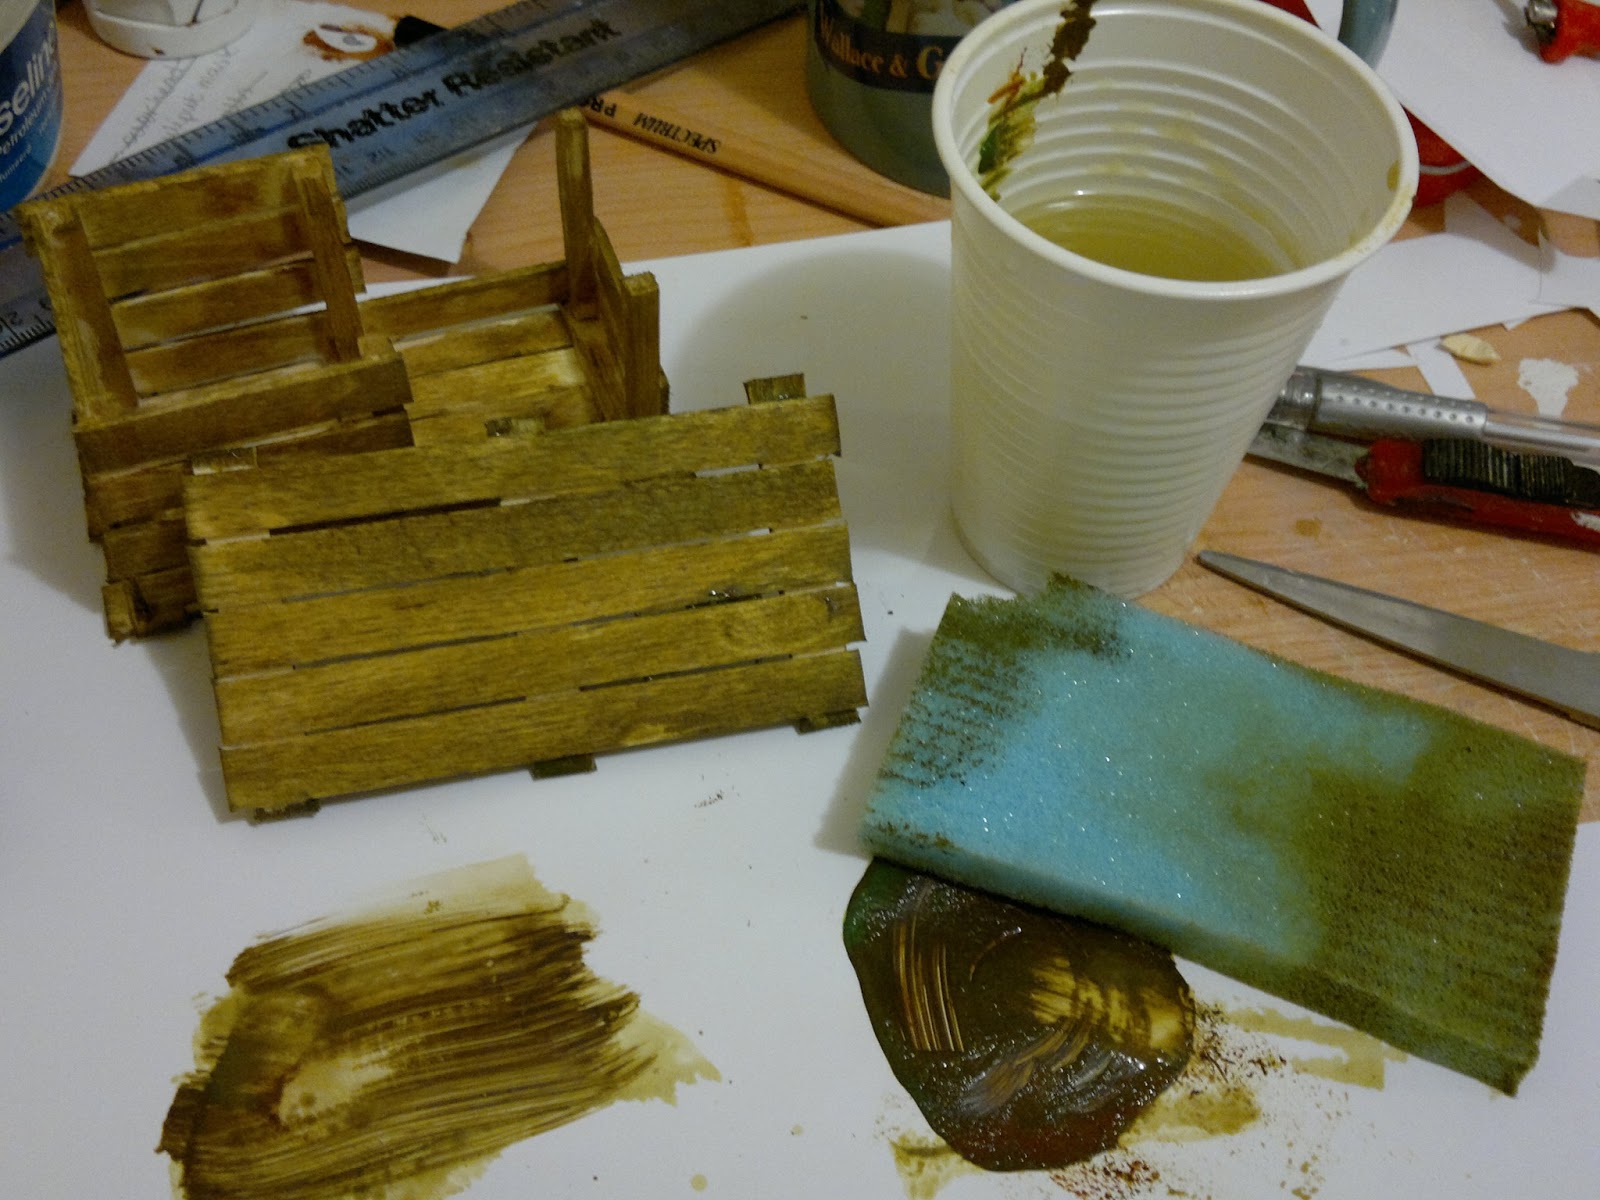
To make the main structure of the box/ cage I cut up lots of lollipop sticks and some bits of balsa wood and just glued them together using superglue. I built it in a way that it looked like a crate and I snapped some of the sticks so that it looked a little bit more authentic (ish).


I then painted over the box using some watered-down brown paint, after trying to stain it with teabags didn't do that much to it. I then glued some net onto the inside (it's a hair net in case you were wondering!), and I made a starfish out of Miliput, that I then painted orange, to stick on top of the crate. 


The Fishing/ Bait Box!
To make the Fisherman's bait box I just cut out lots of pieces of Balsa wood that I then painted and glued together (again with superglue) in a cube shape. I find that if you're going to be painting something and gluing it together with superglue it's best to paint it before you glue it as it's really difficult to paint over the glue - the more you know, aye?!


I then glued on some handles, hinges and a lock that I'd brought off Ebay. They're all dollhouse products and I think they make it look pretty ace, if I do say so myself!


 Fisherman's Stool!
To make his stool I used a combination of lollipop sticks, a balsa wood rod and some tiny nails! I doubled up the lollipop sticks so that they were a little sturdier and then cut everything to size.


I painted all the pieces a nice, dark brown and then glued everything together. I reinforced all the glued up parts with the tiny nails. I then attached a strip of fabric over the frame to make the seat.


The Oars!
To make the oars I roughly cut out the shapes for the two parts of the oars and then sanded around the edges to round them off a little. Once they were all nice and smooth I painted them and glued the parts together.


The Signs!
The hut in the set needs a sign on the top and a sign on the door and I wanted to make them so that they'd look as rustic as possible. I tried to make them look like slabs of wood that had been nailed/ glued together so I used different size lollipop sticks. I then painted them both brown and added a chain off an old bracelet to the smaller sign. Finally, I painted on the writing/ details.


I've got quite a bit more to talk through but I think that this is enough for today! Thanks for taking a look! More on the props and set to come soon.

Thursday, 25 April 2013

Clothes and Coverings!

In my last post I talked about my fisherman's head, and in this one I'm going to talk through his clothing and also the seagulls final look. I would have got around to posting sooner but I wanted to add some final touches to both puppets before posting any pictures - I still have the odd things to do on them but they're essentially done now and ready for viewing! I won't drone on too much with how I made everything, I'll just let the pictures do the talking!

For my fisherman's jumper and hat I wanted them knitted so that they'd look a bit more realistic (ish) and also absolutely adorable!! My only drawback here was that I'd actually never knitted anything in my life, but what better time to learn than with a major deadline approaching aye?! It's safe to say I wasn't the quickest at knitting, though I sort of got the hang of it quite quickly, it took me way too long to even produce this - which for my first ever attempt I'm pretty pleased with to be honest!


Luckily for me, my lovely mum (and knitting master), stepped in and offered to knit my character's jumper and hat for me (I say offered, I practically begged her!). And doesn't he look adorable?! minus the creepy white face of course.


Next it was time to make his overalls. I managed to find the perfect yellow, PVC material after hours of searching and purchasing the wrong type of fabric to start off with. Though the look of it was great it was really hard to get into the right shapes, as it only really stretched one way. After a little mental breakdown and copious amounts of hot chocolate I managed to get it how I wanted it! Huzzah!


When the overalls were all sewn up and on the body I started adding some details. I was so fortunate to find the perfect material for his braces/ straps. They came off an old necklace (the same one I got his bead eyes off in fact - it always helps to hoard things!) which had the perfect metal parts at the ends that I could then use for the buckles on the straps. I then added a pocket using the same PVC material, and a little later on I added turn-ups to the bottom of his trousers (they're not in this picture though).


To finish off his head I added this fur material I brought from Cardiff Market, it wasn't really the colour I wanted but I think it works nether the less. I cut it into all the shapes I needed and then sprayed them with Starch so that the fur would stay in place a little better. I'm pretty pleased with how he looks!


And before I reveal the final image of him I'll quickly tell you about the seagull - For the seagull I just sewed bits of fabric together to create his feathers. Before doing so though, I made an eye socket using Air Dry Fimo which I just placed where I wanted the eyes to go then pushed the bead eyes into it to make the shape. 


Finally, here we have the final images of the two characters! I haven't posed them yet as I don't really want to move them too much before animating in case the wire gets too worn out. I hope you like them!


Thanks for taking a look! I'll be posting the props and set as soon as I can!

Thursday, 18 April 2013

Building the Head

I've currently got the whole head finished, and the entire puppet to be honest, but I'm only just getting around to posting about it - naughty!

Okay, so I started off by making eye sockets - I just pushed the beads I was going to use as eyes into a slab of Fimo, that I cut to shape and then baked it. For this head I'm making it in a very different way to how I've previously made heads so there has been a lot of trial and error on the way. I ended up making 2 eye sockets as I had put the eyes too far apart. To check how the face would look I made quick sculpts of the face onto the sockets using Plasticine. I then made some paper moustache/ eyebrows/ sideburns and stuck them on because the face looked creepy without them!


I then glued my chosen eye socket onto a piece of polystyrene that I'd carved to roughly the shape of the character's skull. Shoving a long piece of K&S in it so it would fix to the neck joint and it was ready to go. I then went about sculpting the face directly onto the skull, using Fimo, which by all accounts was a completely stupid thing to do and I'll tell you for why - 1. you can't easily peel the face off, even with lots of Vaseline underneath, without it loosing its shape and 2. the Fimo I used needs to be baked, this means putting the whole thing in the oven! Looking back, I can see how silly it was to think putting polystyrene in the oven and having it come out unscathed was (then again it was the middle of the night when I did this so no judgments here please?!)


And here is the result: a shrunken, mess of a skull and a cracked face, that only just came off! You'll be pleased to know I did a better job on the actual thing though.


I then went about the build a little differently, especially after researching into better techniques and things. Luckily, I was able to salvage the eye sockets, so that was then glued onto a new skull shaped piece of polystyrene (don't worry, I knew what I was doing this time!). I then added Ultra Light Sculpy to the head to give a better shape and hold the eye socket on place more firmly. This Sculpy (green was the only colour I had in case you're wondering) is air drying so I didn't need to risk another oven fiasco! 


When the whole head was dry I then made a "mask" on top of the front of the face - with the eyes in place - using Miliput (also air drying!!). I put a load of Vaseline on the head before I sculpted though, which is a very handy thing to do if you want the face to come off. The mask didn't need to be neat but I had to make it the right size and shape that I wanted the removable face to be. When it was dry I could then sculpt onto it quite easily and pop it in the oven no problem!


I sculpted the back of the head straight onto the skull, as it didn't need to be replaceable. To do this I used air drying Fimo clay then shoved the ears from my previous sculpt on top. I then added magnets to both the skull and "face mask" so that they would fix together more securely.


 Here is the head looking rather eerie without any eyes! 

I then went about painting all the parts of the head, trying to match the colour of the hands as best I could. I'm pretty pleased with how it's turned out and as I'm not doing any replaceable mouths for this character - he doesn't talk and all his expression comes from his eyes/ eyebrows/ 'tache anyway - I tried to make it as simple yet striking as I could.


And here he is! Well, minus his hair/ brows/ sideburns/ real 'tache and other key parts, but who cares aye?! 
I'll be posting images of how the final head looks when I get round to doing one on his clothes, so don't you worry your cotton socks about it.

Thanks for taking a gander anyway, and hopefully soon I'll get around to posting his final look, along with the seagull!

Monday, 1 April 2013

Padding out and Latexing up!

Right, prepare yourself for what will most certainly turn out to be a pretty long - possibly tedious - post. I want to get through both the padding out of my fisherman character and my seagull, and then also the Latex work that went into them. 

So a couple of weeks ago I got the padding out stage of my puppets done but I wanted to wait until the Latex parts were done before posting (I'm not entirely sure why but lets just roll with it shall we?!). To pad out firstly I had to pad the "hard" parts of the body using hard foam, these include areas such as the chest and hips, as you don't want those parts getting all squished when you're animating as it just looks weird. How I like to think about it is adding a solid pair of pants and solid sort of cropped vest to my character. I glued these parts on using two part epoxy glue - making sure I left holes for the rigging points to poke on through.


Once the solid parts were glued on I then had to glue on the soft foam onto the areas where the joints or parts need to flex. I find cutting chunks to roughly the right shape then gluing them on before trimming to the required shape is the best way of going about padding the soft areas. For this I used a different glue, one that dries strong but still allows movement.


When the mid section was covered I then went about covering it in a sort of foam jumper. First, I made a kind of vest and then added some sleeves, but this is all meant to be the fisherman's *ahem* slightly plumper frame shall we say. It may need to get trimmed down though towards the end, depending on how thick the jumper comes out.


I then went and padded out half the legs - the wellies will add to the bottom section when made. The seagull was then padded out in the same sort of way, though the whole of his body is soft foam and his head is hard foam.


Okay, sorry to drag the post on but I'll just quickly run through the Latex areas of the characters - I've already told you how I made the hands here, and the rest is all a similar sort of process except for that they were made using just a one part mould (that may not be the technical term but ahh well) rather than a two part mould.

First things first I got the parts for Latexing sculpted out using Plasticine. By the by, this is my second attempt at the seagulls legs as I sculpted them before and then made the wrong type of mould, wasting like a week of work in the process - woe is me!!


When the sculpts were done and smoothed down with talcum powder it was then time to make the moulds. I made a box around the the sculpts using some plastic sheets and held them in place with copious amounts of tape and clay to stop any leaks when the plaster was poured on.


It was then time to pour the plaster on, making sure everything was smothered in Vaseline first of course. When everything was dry it was then time to take out the Plasticine sculpts.


When all the Plasticine was out it was time to clean the moulds before adding layer after tedious layer of precoloured Latex. It was then time to put the armatures in the mould before chucking a load more Latex in afterwards. The feet needed padding out a little first but after that they were good to go.


After a day of drying and then another day of drying after I had to redo the legs, my Latex parts were done! Huzzahh!!

This is the legs when they first came out the mould before I redid them!


And here - you lovely patient person, you! - are my puppets as they are now, with all the Latex parts and padding all on. 


Thanks for taking a look, more to come soon!